

To be honest, I'm not a huge fan of mooncakes! I find the dough usually too thick and cloying and I dislike red bean paste.
I do love mochi however, and these snowskin mooncakes are first of all awesome because they are NO-BAKE, but second of all, I think the taste is much better than that of the baked traditional mooncakes.
This is NOT an easy recipe however, at least for me, not a highly skilled baker. I classify this recipe as advanced.
Another thing to take note of is that the mooncakes need to be eaten the same day and preferably immediately. If you are planning to make these mooncakes, I would recommend getting started in the morning and making a day of it.
The actual making of the mooncakes isn't necessarily that long, but there are several breaks needed to be taken for the chilling of the dough which will eat into your time.
So let's get started!
 - puree")
Making the Pumpkin Paste
In a small pot, on low heat, add your pumpkin puree. Then grab your glutinous rice powder and slowly add it while mixing until it forms a thick paste. Let the mixture cool off a bit, and then add it to the fridge to cool off for a hour.
After they have chilled, roll the paste into balls about 20 grams in size. Add these to the freezer to chill for 30 minutes or so.
Making the Snowskin Wrapping
While the paste is chilling, we're going to make the snowskin wrapping for the mooncake. So grab a large bowl, one that will fit inside of your steamer and you're going to add all of your dry ingredients: the glutinous rice flour, rice flour, and cornstarch and give it a mix.
Next, place a fine mesh sieve over the bowl and sift your powdered sugar aka confectioners sugar.
In a medium sized bowl, mix together your wet ingredients: the milk, vanilla extract, and vegetable oil.
Next up you're going to combine the ingredients. Take the dry ingredients and make a hole in the middle of it, with a spoon. Then you are going to gradually add the wet ingredients into the mixture, just a tablespoon or so at a time. Make sure that the ingredients are mixed and combined before you add more wet ingredients.
 - wet dough")
Eventually you will get a very soupy dough, which is what you're going for!
Prepare your steamer, and place your large bowl inside. You will steam the mixture for about 20 minutes.
 - steamed dough")
To check if the dough is ready, stick a chopstick into the middle. If it comes out clean, the dough is ready to go!
You're going to put that on the cutting board to cool off until it's safe to handle, about 20 minutes or so
After it's been cooled off, scrap the dough out of the bowl with a spoon and you're going to knead it with the spoon and then your hand for about 5 minutes until it forms a ball.
Then transfer the dough to a clean surface and knead it by hand for another 5 minutes.
At this point, you're going to add your food coloring. I chose to add the food coloring to over half of the mooncakes so that I would have both white and orange mooncakes.
I don't have an exact measurement of the amount of food coloring that you should use, but measure out mostly yellow food coloring and just a dab or red food coloring to color it orange. The red food coloring is extremely potent.
 - dough ball")
 - dough in plastic")
Rub the mixture all over the dough to get the desired coloring and add more food coloring as needed. When you've achieved the desired color, knead the dough for 2 more minutes to make sure that the color is infused throughout.
Then wrap it up in a piece of plastic and chill it in the fridge for 30 minutes
 - mini dough balls")
Assembling the Mooncakes
Grab the chilled mooncake dough from the fridge and shape them into balls of approx 30 grams.
 orange dough")
Put them back into the fridge to chill for another 20 minutes since the heat from your hand will have softened the dough too much for the mooncake press.
Next, place the ball of dough on the cutting board and shape them into circular pieces of dough. Not too thin, or the filling will come bursting out. This video was really helpful in helping make the circular shape.
Next, grab your balls of pumpkin puree and place once of them in the middle of your circular dough.
Fold the edges of the dough together so that the dumpling is sealed.
Grab your mooncake press and gently stuff the round piece of dough inside.
Place the end against the cutting board and press firmly but gently for about 20 seconds and carefully push the lever to release our your gorgeous little pumpkin mooncake!


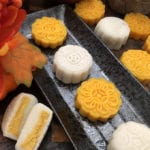
No-Bake Snowskin Pumpkin Mooncakes
Ingredients
Wrapper
- 1 cup glutinous rice powder
- 1 cup rice powder
- 1/2 cup cornstarch
- 3/4 cup powdered sugar
- 1 1/2 cup milk
- 1/3 cup vegetable oil
- 3/4 tsp vanilla extract
Pumpkin Filling
- 1 1/2 cup pumpkin puree already sweetened, for making pumpkin pie
- 1 1/2 cup glutinous rice flour
Instructions
Mooncake Dough
-
In a large bowl, which will fit in your steamer, mix rice flour, glutinous rice flour, and cornstarch well
-
Strain the confectioners sugar through a fine mesh strainer and add to the large bowl
-
In a small bowl, mix milk, vegetable oil, and vanilla extract
-
Form a hole in the middle of the batter, slowly add in the wet ingredients while mixing to combine before adding the rest. The mixture that you have after you add all the wet ingredients will be super runny, which is how it should look!
-
Grab your steamer, I used my metal one but a bamboo one works also. Once the water is boiling, add your large bowl and steam for 20 minutes. To check if the mixture is done, stick a chopstick into the middle of the batter. If it comes out clean, its ready to go!
-
Remove the bowl and let it cook-off for at least 20 minutes
-
Scrape the dough from the bowl and knead it for 5 minutes until it forms a ball.
-
Add the ball onto a cutting board and knead it for another 5 minutes until supple.
-
Form it into a ball again and wrap it in plastic. Put it into the fridge to chill for at least 20 minutes
Pumpkin Filling
-
On low heat, add the pumpkin puree
-
Slowly add the glutinous rice flour and mix until the consistency of the puree is thickened into more of a paste.
-
Let the paste cool off for 20 minutes, then chill in fridge for 1 hour
-
Once chilled, form the paste into balls, approx 20 grams
-
Place the balls on a cooking sheet topped with parchment paper and add to the freezer for 30 minutes before making the mooncakes
Making the Mooncakes
-
Make the dough into balls, approx 30 grams. Place into the fridge and chill for at least 20 minutes
-
Place the ball on your cutting board and roll into a circular piece of dough with a rolling pin (the disc should be roughly the size of the palm of your hand)
-
Place the circular dough onto your hand and take the pumpkin paste and place in the middle.
-
Gather the ends of the wrapping and pinch the ends so that the dough forms around the paste. You can discard any excess dough.
-
Repeat with the rest of the dough
-
Carefully place the stuffed balls of dough into your mooncake mold.
-
Place the mooncake mold onto your cutting board and press the lever until the dough hits the cutting board. Hold carefully for about 20 seconds. Push the lever to pop out the mooncake
-
These mooncakes should be served immediately! They don't keep well for the next day


